Last year for my birthday my sister, Marie, gave me several gifts and each of them were wrapped in doll themed paper. She knows how I love dolls. One of the wrapping papers had wonderful vintage dolls on it and she told me the story of the paper.
You see, Marie is the most giving and kind hearted soul. She cleans houses for elderly folks and also spends lots of time just listening to them and being a comfort. One of her ladies knew that Marie was meeting me for my birthday (this was last August) and that I love dolls. That sweet lady who doesn't even know me told Marie that she had some wrapping paper and went to get it. It was a roll of vintage wrapping paper with these amazing dolls all over it. How very thoughtful.
So when I met Marie for our get together and she told me the story I decided that I would make some cards with the paper. I made two sets...one for Marie and one for the lady who gave her the paper. I made each card different and sometimes added lace or paper doilies. I lined each envelope with pretty paper. Then I tied the sets with ribbon and gave them to Marie for herself and to pass along to her client.
This is such an easy way to use paper that would otherwise be thrown out. I like to crumple the paper and give it a real worn look with all the wrinkles and character. Wrapping paper works really well because it is lightweight and easy to work with. You can tear around the image for one look or cut around it for another version. If tearing...remember the paper torn off away from you will leave a clean edge and the paper torn off towards you will leave a white edge. That can also be part of the look for the finished cards. Try using tissue paper on cardstock. You can either buy blank cards and envelopes or you can cut card stock and use that for the cards. Envelopes are fun and easy to make from templates or just buy blank envelopes at the supply store.
Hmmm...gifts for birthdays, holidays or next Christmas. Make a few sets here and there and put them into that gift cupboard for just the right occassion.
P.S. It is always extra nice to stamp handmade on the backs of the cards. I don't date them from experience of misplacing them and finding them years later...not good to give an old dated card set that has no vintage value.
Do you make and give handmade cards? Do you premake cards and keep a supply on hand for all those occassions that pop up at the last minute?
Now I should do as I say and play in the studio making some card sets.
Joyful January 2012 to everyone...
Showing posts with label paper. Show all posts
Saturday, January 7, 2012
Sunday, November 27, 2011
Finding Nemo Silhouette...
I am linking with Memory Lane Monday hosted by Donna of Brynwood Needleworks. A few days ago Donna did a post regarding her husband's silhouette and how she was able to display it.
I was remembering I had my silhouette done when I was a young girl and I should get it out to view.
As you can see, I found it. Mine however is in terrible condition. My mother's home burned down years ago and therefore it has lots of smoke and water damage. I feel extremely fortunate to even have it after all those years.
I remember when it was done. Our family was at a state fair and one of the vendors was hand cutting silhouettes. I don't have any idea how much it cost but I know my mother got one of each of three of us sisters.
I was probably about nine or ten here as that is how my hair was at that age. This photo is blurry but you can still see the incredible detail that exists in this silhouette. I was so entranced with the man and his little scissors that I could hardly sit still for him. I wanted to watch him cut that black paper. When he was all done with the three of us girls I still wanted to watch him cut with his small scissors and his nimble hands. So...
Just for me he took a very small piece of his special black paper and cut this tiny little bug. To this day I am amazed at the details he achieved by just free-hand cutting with those ordinary looking small scissors. I was over the moon when he generously gave me the little bug. Ordinarily I would not want to be close to any bugs even if they are made of paper.
Come to think of it...I have a passion for small scissors and cannot get enough pairs. No...sadly I cannot cut paper into any silhouettes or bugs or anything else.
It makes me happy to have my Silhouette by Nemo even in the sad condition it is in...frame and all. You know that it is quite old as I am decades from nine or ten now.
Thank you Donna for hosting Memory Lane Mondays. I love reading stories that are shared from the heart.
Happy Week of Productivity to all in this busy season. Jingle Bell Joys...
I was remembering I had my silhouette done when I was a young girl and I should get it out to view.
As you can see, I found it. Mine however is in terrible condition. My mother's home burned down years ago and therefore it has lots of smoke and water damage. I feel extremely fortunate to even have it after all those years.
I remember when it was done. Our family was at a state fair and one of the vendors was hand cutting silhouettes. I don't have any idea how much it cost but I know my mother got one of each of three of us sisters.
I was probably about nine or ten here as that is how my hair was at that age. This photo is blurry but you can still see the incredible detail that exists in this silhouette. I was so entranced with the man and his little scissors that I could hardly sit still for him. I wanted to watch him cut that black paper. When he was all done with the three of us girls I still wanted to watch him cut with his small scissors and his nimble hands. So...
Just for me he took a very small piece of his special black paper and cut this tiny little bug. To this day I am amazed at the details he achieved by just free-hand cutting with those ordinary looking small scissors. I was over the moon when he generously gave me the little bug. Ordinarily I would not want to be close to any bugs even if they are made of paper.
Come to think of it...I have a passion for small scissors and cannot get enough pairs. No...sadly I cannot cut paper into any silhouettes or bugs or anything else.
It makes me happy to have my Silhouette by Nemo even in the sad condition it is in...frame and all. You know that it is quite old as I am decades from nine or ten now.
Thank you Donna for hosting Memory Lane Mondays. I love reading stories that are shared from the heart.
Happy Week of Productivity to all in this busy season. Jingle Bell Joys...
Labels:
cutting,
memories,
paper,
scissors,
silhouette
Saturday, November 19, 2011
ATC Beauties Received...
Do you enjoy ATCs? I enjoy making them, giving them and receiving them. Even better I love a little surprise Random Act of Kindness in my mail. This lovely French themed card I recieved from the equally lovely and very talented Dorthe of Den Lille Lade. The bits of lace and the wooden button really add such detail. Thank you dear Dorthe.
These little gems came to me from Australia. Judy of Judy's Fabrications is another lovely lady with lots of talents. She created this adorable little fabric stocking ornament with beads sewn on. I adore it and the card with the 3D candle and holly. Thank you dear Judy.
Look at this lovely pear. This ATC is made with napkin applique and enhanced with some beautiful gold leafing which does not show up well in this photo. Meet Daniella of Layers of Creativity. I am certain we will be swapping ATCs on a regular basis as Daniella loves making these little works of art.
This very Thanksgiving Autumn ATC is made by my friend Joy. She does not have a blog...yet. Joy is uber creative and has the most beautiful gardens surrounding her home. I had sent her an ATC just because and that introduced her to this little bit of art and creativity. Joy is now making beautiful ATCs and teaching her mother, Eva, to make them as well. They are now looking to swap with others. I am linking Joy to all the best people I know. Under the little brown scalloped flap she has stamped swirls and written "Family and Friends" in the most fluid perfect cursive writing. Thank you Joy...your little ATC brings me much "joy".
And here is Eva's (Joy's mother) gorgeous ATC that she also sent me last week. I believe Eva fussy-cut the roses. Remember years ago when we sat with tiny manicure scissors and fussy-cut tiny little scenes and then made framed 3 dimensional pictures? I loved those. That is when I learned to turn the paper not the scissors. I am thrilled that our little creative world shares and allows us to spread all the happinesses that come from such wonderful talented artisans. Thank you Eva for this little piece of art. No link here as Eva has no blog, however she does want to swap ATCs with others.
I would be happy to pass along any swap info to Joy and Eva if you just let me know here in comments or via email.
Blessings and peace as you enter this busy week of holiday preparations...Thanksgiving here in the US.
I am truly blessed and so grateful for the gift of blogging friends and gracious giving.
These little gems came to me from Australia. Judy of Judy's Fabrications is another lovely lady with lots of talents. She created this adorable little fabric stocking ornament with beads sewn on. I adore it and the card with the 3D candle and holly. Thank you dear Judy.
Look at this lovely pear. This ATC is made with napkin applique and enhanced with some beautiful gold leafing which does not show up well in this photo. Meet Daniella of Layers of Creativity. I am certain we will be swapping ATCs on a regular basis as Daniella loves making these little works of art.
This very Thanksgiving Autumn ATC is made by my friend Joy. She does not have a blog...yet. Joy is uber creative and has the most beautiful gardens surrounding her home. I had sent her an ATC just because and that introduced her to this little bit of art and creativity. Joy is now making beautiful ATCs and teaching her mother, Eva, to make them as well. They are now looking to swap with others. I am linking Joy to all the best people I know. Under the little brown scalloped flap she has stamped swirls and written "Family and Friends" in the most fluid perfect cursive writing. Thank you Joy...your little ATC brings me much "joy".
And here is Eva's (Joy's mother) gorgeous ATC that she also sent me last week. I believe Eva fussy-cut the roses. Remember years ago when we sat with tiny manicure scissors and fussy-cut tiny little scenes and then made framed 3 dimensional pictures? I loved those. That is when I learned to turn the paper not the scissors. I am thrilled that our little creative world shares and allows us to spread all the happinesses that come from such wonderful talented artisans. Thank you Eva for this little piece of art. No link here as Eva has no blog, however she does want to swap ATCs with others.
I would be happy to pass along any swap info to Joy and Eva if you just let me know here in comments or via email.
Blessings and peace as you enter this busy week of holiday preparations...Thanksgiving here in the US.
I am truly blessed and so grateful for the gift of blogging friends and gracious giving.
Sunday, October 30, 2011
Happy Haunting Halloween...
Last of the ATCs...well maybe. I made these two folders for Roni and her Mom. They hosted an ATC swap and the results of that will be posted next week. If you have never participated in a swap I highly recommend it. Lots of fun!
Inside the ATC folder. I kept this pretty simple and flat as I think my post office service is not fond of me or my artwork I pay extra to hand cancel and send safely.
Here are the ATCs I included inside the folder.
Here is a piece of artwork I won from Lindsay. Her work is unique and she has been published so many times I have lost count. Please go see what Lindsay is up to in the creative realm.
This is made on a Mahjong tile and I adore it. Mr. C always says I ride a broom.
Thank you Lindsay.
Here I am wearing my Halloween casual clothes. Glittered pumpkin socks, a soft orange jacket my dear sister gave me that I get so many compliments each year when I wear it and my new Mahjong Witch pendant.
Yes, another ATC that is in the mail. By-the-way this is some of Lindsay's artwork that she got printed by Pinecone Press into 12" x 12" scrapbook papers. Super cute drawings all over the entire sheet. I only wish I had purchased many more pages.
And you asked me to post my costume I wore at the local Chamber of Commerce Saturday as I hosted the Visitor Center. Here I am in all my Witch glory...complete with Trick or Treat bag I made years ago. While I was at the CofC I had lots of people take a second look. Several asked if they could take my photo and I said with a smile, "If you must". :o) It was a great day and I was definitely channeling my Grandma and Mother. Grandma's birthday was October 30th and she finally gave in and always dressed up as a witch each year...of course creating her very own costumes and always out-doing herself every year. So...
In the tradition of Halloween and my lineage I am continuing this Witch costume theme and enjoying it very much.
Happy Haunting and Safe Trick or Treating to you all...
Inside the ATC folder. I kept this pretty simple and flat as I think my post office service is not fond of me or my artwork I pay extra to hand cancel and send safely.
Here are the ATCs I included inside the folder.
Here is a piece of artwork I won from Lindsay. Her work is unique and she has been published so many times I have lost count. Please go see what Lindsay is up to in the creative realm.
This is made on a Mahjong tile and I adore it. Mr. C always says I ride a broom.
Thank you Lindsay.
Here I am wearing my Halloween casual clothes. Glittered pumpkin socks, a soft orange jacket my dear sister gave me that I get so many compliments each year when I wear it and my new Mahjong Witch pendant.
Yes, another ATC that is in the mail. By-the-way this is some of Lindsay's artwork that she got printed by Pinecone Press into 12" x 12" scrapbook papers. Super cute drawings all over the entire sheet. I only wish I had purchased many more pages.
And you asked me to post my costume I wore at the local Chamber of Commerce Saturday as I hosted the Visitor Center. Here I am in all my Witch glory...complete with Trick or Treat bag I made years ago. While I was at the CofC I had lots of people take a second look. Several asked if they could take my photo and I said with a smile, "If you must". :o) It was a great day and I was definitely channeling my Grandma and Mother. Grandma's birthday was October 30th and she finally gave in and always dressed up as a witch each year...of course creating her very own costumes and always out-doing herself every year. So...
In the tradition of Halloween and my lineage I am continuing this Witch costume theme and enjoying it very much.
Happy Haunting and Safe Trick or Treating to you all...
Labels:
art,
ATC's,
Chamber of Commerce,
creativity,
Halloween,
paper,
ribbons,
witches
Monday, October 3, 2011
Black Magic Journal Pages...
Working on my Discovery Journal with Roni of Ink Stains here are some photos of the "Black Magic" technique. This post is photo heavy as I needed to show different stages. These are my acrylic blocks for use with clear stamps. I only own a 1" square and two 1" x 3" pieces. However my stamp for this technique is larger than these. Maybe 4" x 6" and I went shopping only to discover I cannot afford an acrylic block to fit. Our little town does not offer 40% off coupons and I will not be "down the hill" any time soon.
This is a clear stamp set I won from Roni several months ago. I just knew I wanted to use these in my page. Hmmm...what could I use to hold the stamp? Part of the allure of Roni's class is the idea of using what we have and not rushing out to buy the latest and greatest whatever.
Aha! I have an old 5" x 7" acrylic table frame and thought it might work as it even has a handle to hold while postitioning the stamp. Lets see...
Here is my clear stamp stuck to the frame. I have also inked it with white acrylic paint for this technique.
Positioned on the black paper. Pressed it down and...
Perfect stamped image. I love the white acrylic stamped on the black paper. This looks like damask fabric.
Now to use my colored pencils. I love colored pencils and have lots of them. These are just my basic ones.
Here is the fun of the stamped image. By using white acrylic paint you can now color over it with pencils or lots of other mediums which you will read about over at Roni's blog.
Here is the one I colored.
Here is the stamped image without the coloring.
My pages are not done. I didn't have full size black paper as mine were all cut into half sheets. Hmmm??? Use what I have. I still have to mount these and include my two lists...(l) What I am good at, (2) What I'd like to learn. This was an interesting challenge to write out the lists.
I love the Black Magic technique and definitely will be doing this again. I can see cards made with this technique.
Once again thank you Roni for helping me to explore and learn new art techniques. My colored pencils are so very happy to get used and not just sit there looking pretty.
Are you working on your very own Discovery Journal?
Our weather has changed and we are expecting rain. The clouds are moving in and I for one am looking forward to rain. We haven't had any in many months and it would be so nice for some refreshing moisture. Our Fall colors are really beginning to show their early stages.
Wonderful Week to all...
This is a clear stamp set I won from Roni several months ago. I just knew I wanted to use these in my page. Hmmm...what could I use to hold the stamp? Part of the allure of Roni's class is the idea of using what we have and not rushing out to buy the latest and greatest whatever.
Aha! I have an old 5" x 7" acrylic table frame and thought it might work as it even has a handle to hold while postitioning the stamp. Lets see...
Here is my clear stamp stuck to the frame. I have also inked it with white acrylic paint for this technique.
Positioned on the black paper. Pressed it down and...
Perfect stamped image. I love the white acrylic stamped on the black paper. This looks like damask fabric.
Now to use my colored pencils. I love colored pencils and have lots of them. These are just my basic ones.
Here is the fun of the stamped image. By using white acrylic paint you can now color over it with pencils or lots of other mediums which you will read about over at Roni's blog.
Here is the one I colored.
Here is the stamped image without the coloring.
My pages are not done. I didn't have full size black paper as mine were all cut into half sheets. Hmmm??? Use what I have. I still have to mount these and include my two lists...(l) What I am good at, (2) What I'd like to learn. This was an interesting challenge to write out the lists.
I love the Black Magic technique and definitely will be doing this again. I can see cards made with this technique.
Once again thank you Roni for helping me to explore and learn new art techniques. My colored pencils are so very happy to get used and not just sit there looking pretty.
Are you working on your very own Discovery Journal?
Our weather has changed and we are expecting rain. The clouds are moving in and I for one am looking forward to rain. We haven't had any in many months and it would be so nice for some refreshing moisture. Our Fall colors are really beginning to show their early stages.
Wonderful Week to all...
Wednesday, September 28, 2011
Faux Beeswax Pages...
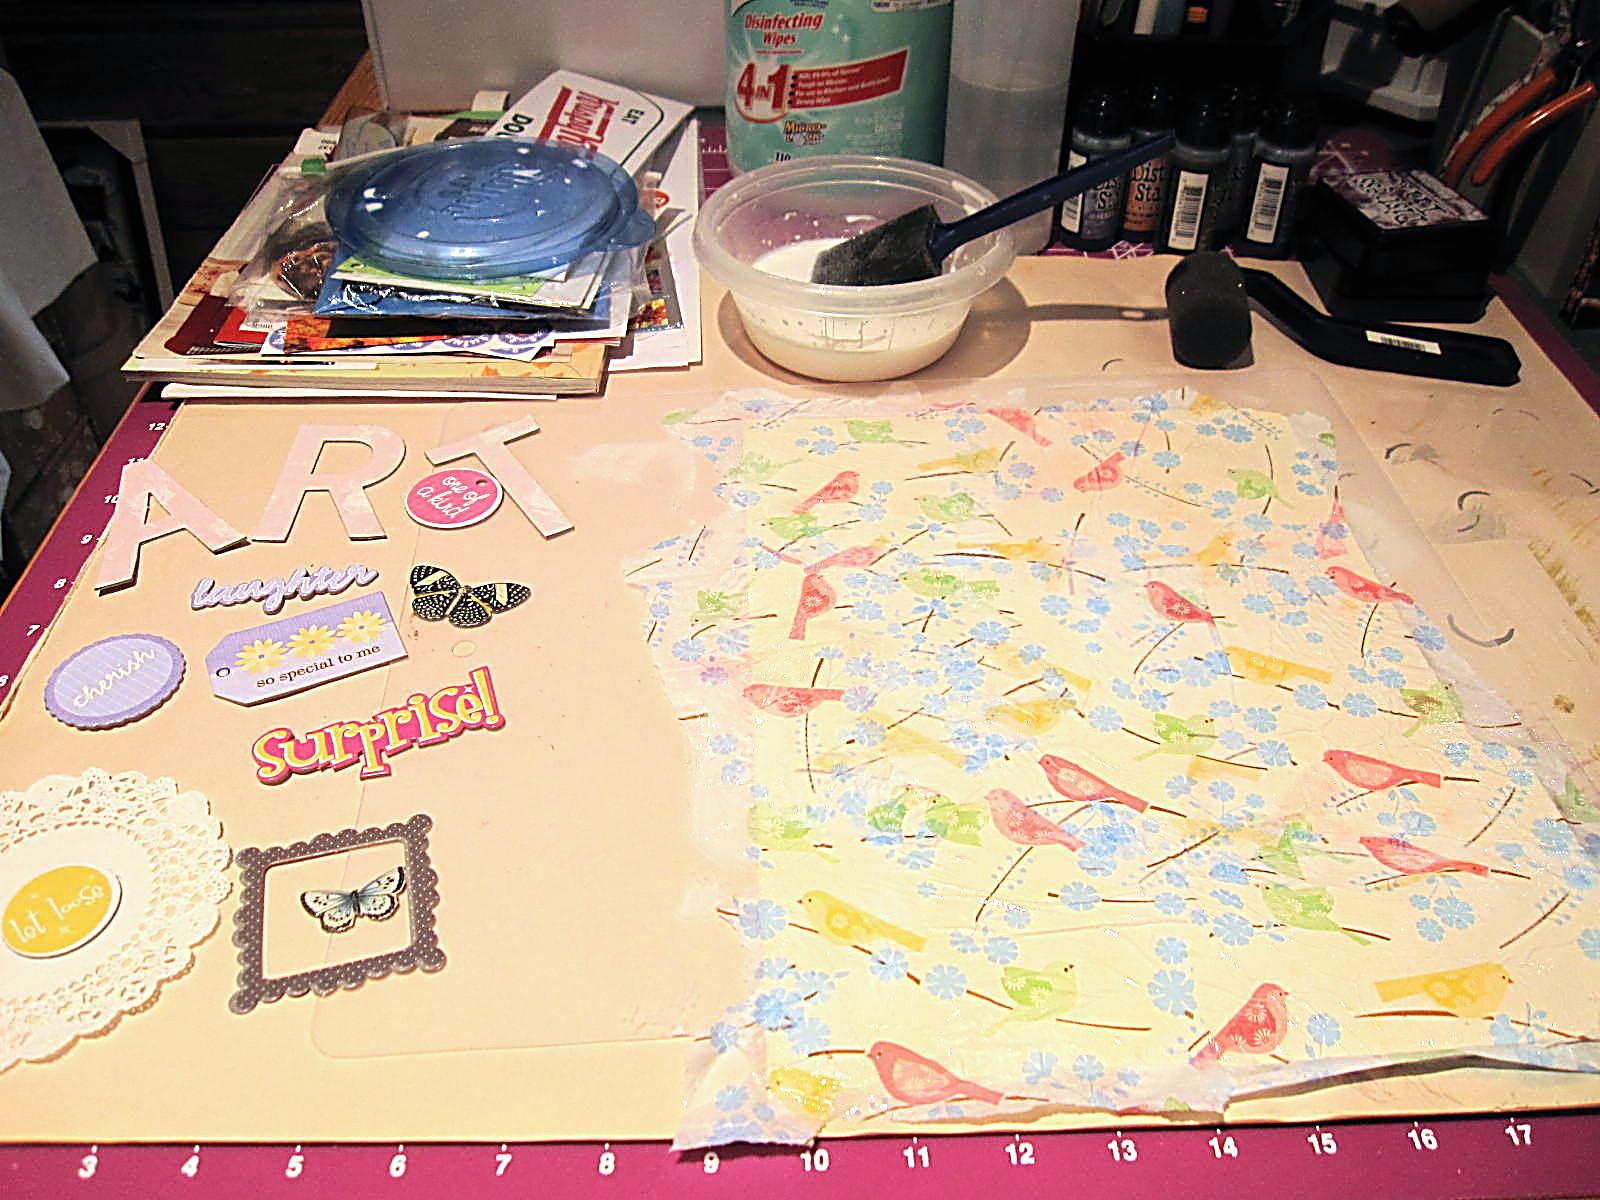
In continuing with my Discovery Journal I am making at the expert guidance of Roni...Ink Stains fame this is my faux beeswax attempt. I used a manila folder and tore it down the middle giving me two pages to work on. In the future...yes I will be doing this technique again...I will select a sturdier base to work on. I think I would like this effect on a paper mache store purchased container like a hatbox. My pages warped and turned out a bit stiff and therefore do not turn easily in my 3-ring binder. This first photo is sort of my layout. I am using tissue, paper lacy doily and lots of chipboard pieces.
On this page I am using the same materials and adding a torn magazine photo. This photo shows the glue process. I used a white Elmers glue and it takes quite a while to dry as I really gave everything a good coating to be certain they were adhered. As my pages warped I would press down the items and apply more glue.
Now I have added and glued a layer of dressmaking pattern paper to the page. This also helps hold down the chipboard objects. I did also use a foil top off a wine bottle you can barely see in the bottom right corner. Everything appears cloudy now because the white glue has not dried but will eventually be clear.
Here is a page all dry and stuck down. I think the dressmaker pattern tissue gives the pages just the right tone that resembles warm beeswax. The page is slightly warped but that is not a problem for this piece. Please remember I am practicing a new technique Roni is teaching us. I do not expect perfection from myself in this journal as that is what normally keeps me from attempting to make things.
On this dried page I have added the crowning touch of Perfect Pearls and hand rubbed it in. I did not have the same color as Roni so I used what I had. That is part of the fun of this Discovery Journal techniques class. We are using what we have so we don't have to rush out and pay big bucks on new supplies we might never use again. I truly appreciate that about Roni and her style. My art budget is very tight these years and I am thrilled to be able to make art with what I have in my cupboards.
Thank you once again Roni. I really like this faux beeswax and can see it used again in my gift giving.
Now I can begin on the next Discovery technique. Please stay tuned...
Are you following Roni and making your own Discovery Journal? I am super glad I am doing this. It is expanding my skills.
Terrific rest of the week...
September surrenders to Autumn.
On this page I am using the same materials and adding a torn magazine photo. This photo shows the glue process. I used a white Elmers glue and it takes quite a while to dry as I really gave everything a good coating to be certain they were adhered. As my pages warped I would press down the items and apply more glue.
Now I have added and glued a layer of dressmaking pattern paper to the page. This also helps hold down the chipboard objects. I did also use a foil top off a wine bottle you can barely see in the bottom right corner. Everything appears cloudy now because the white glue has not dried but will eventually be clear.
Here is a page all dry and stuck down. I think the dressmaker pattern tissue gives the pages just the right tone that resembles warm beeswax. The page is slightly warped but that is not a problem for this piece. Please remember I am practicing a new technique Roni is teaching us. I do not expect perfection from myself in this journal as that is what normally keeps me from attempting to make things.
On this dried page I have added the crowning touch of Perfect Pearls and hand rubbed it in. I did not have the same color as Roni so I used what I had. That is part of the fun of this Discovery Journal techniques class. We are using what we have so we don't have to rush out and pay big bucks on new supplies we might never use again. I truly appreciate that about Roni and her style. My art budget is very tight these years and I am thrilled to be able to make art with what I have in my cupboards.
Thank you once again Roni. I really like this faux beeswax and can see it used again in my gift giving.
Now I can begin on the next Discovery technique. Please stay tuned...
Are you following Roni and making your own Discovery Journal? I am super glad I am doing this. It is expanding my skills.
Terrific rest of the week...
September surrenders to Autumn.
Sunday, August 28, 2011
August Christmas Continues...
Every year I stockpile gifts for Christmas as the year progresses. I keep a cupboard and a dresser just for these gifts so I know where they are come time to wrap and give. However each year I find myself wanting to do more handmade gifts and every year I run out of time. So this year I decided August would be my month to make some things ahead and have them ready. I picked August because I missed July. ;o)
Here I am making very simple fabric postcards. I love to mail things that surprise people when they get them and these postcards just might be the surprise.
I bought this fabric and knew it would make great postcards. The sizes are just slightly under the required 4" x 6" postal requirements but I knew how to work that. I already had a stash of these very sturdy Strathmore watercolor postcard blanks so they became my base. Then I cut Warm and Natural batting to fit the blanks. I sewed the three pieces together and it looked too plain. So I took a green stamp pad and rubbed the edges with the ink. Now I like the look and consider these done. Of course I am making more than the three I show in the photo.
I hope this gives some of you inspiration and some easy ideas for your holiday gift giving.
Thank you everyone for the birthday wishes. I have had a wonderful month of celebrating.
Happy week to all and I do pray the weather is kind to each of you...
Here I am making very simple fabric postcards. I love to mail things that surprise people when they get them and these postcards just might be the surprise.
I bought this fabric and knew it would make great postcards. The sizes are just slightly under the required 4" x 6" postal requirements but I knew how to work that. I already had a stash of these very sturdy Strathmore watercolor postcard blanks so they became my base. Then I cut Warm and Natural batting to fit the blanks. I sewed the three pieces together and it looked too plain. So I took a green stamp pad and rubbed the edges with the ink. Now I like the look and consider these done. Of course I am making more than the three I show in the photo.
I hope this gives some of you inspiration and some easy ideas for your holiday gift giving.
Thank you everyone for the birthday wishes. I have had a wonderful month of celebrating.
Happy week to all and I do pray the weather is kind to each of you...
Wednesday, July 13, 2011
Lace Wrappings...
What is your favorite style of wrapping a gift?
Happy middle of the week to all...
Thursday, June 16, 2011
Follow Up To Guess This Project...
Each little hard cardboard tent got handpainted with gold paint. Then each one got a strip of gold paper attached to it. Then there was a lot of punching out names and hearts and attaching them to the little tents.
So never look at anything with only one purpose in mind. Anything is possible if you just imagine. My Grandma would be so proud that I learned such a valuable lesson from her. Thank you dear sweet Grandma. I absolutely know she is watching me from heaven and smiling.
My dear friend Lindsay reads my blog and guessed correctly. I think I may be putting the creative vibe in her mind as well. Good job Miss Lindsay Lollipop. :o)
Another week comes to a close and may you each have a terrific weekend. Celebrate the men in your lives as we have Father's Day this Sunday. I will be spoiling Mr. C as I am so fortunate he is in my life.
Happy Creating...
Tuesday, June 7, 2011
May Baskets/Cones...
I used hard paper cones that come from spools of yarn. Covered them in music paper. some lace and buttons and ribbon. Crinkled paper shreds for a "nest" and an egg to add ambiance. Very quick and easy to do. The ladies seemed to like them.
We had a beautiful day of sunshine which is so nice after the tremendous amount of rain and winter we have had right through yesterday. I understand we have had over 87 inches of rain in just under a year. No shortage of water table for us here. I tried to send rain to Texas and Florida but it never got that far. It made it to Utah where my aunt lives however she has had her fill too.
May you enjoy your week and make something creative...
Wednesday, May 25, 2011
Birds and Butterflies...
I had purchased a new Martha Stewart punch with all these wonderful butterflies. I also purchased some premade butterfly cards with envelopes. The stamped butterfly is really gold and embossed on an ecru cardstock. So I took my card and punched the butterflies. Oops...what I didn't realize is that the punch cuts the butterflies completely off of the card. Well that was not attractive. My card front was now very short and my butterfly edge was laying on the table by itself! So I got out the decorative papers and cut a piece to fit the entire front of the card. Then glued on the butterfly border. I also lined the envelope with the same deco paper. Card saved and now usable. I actually like it so well I shall make more like this one using other fun colors.
My prayers and heart go out to all those affected by the horrible tornadoes and extreme weather across the middle section of our great United States.
Monday, January 10, 2011
Heartfelt Thanks...
I hope you know that I will be making some of these wonderful little folders and ATCs for my girls for Valentine's Day. Of course I shall tweak them as not to copy completely. :o)
I just feel like such a lucky girl. Being a part of this generous blogging community and sharing talents and ideas and surprise gifts.
As for this week, our weather is absolutely frigid. I was grocery shopping this morning and most people were talking about how cold it is and when will it end. I heard one woman remark, "This is like living in a refrigerator!" Our high today was 37 degrees F. And this was the day Mr. C decided we would be outside several hours while he cleaned the debris from the roof and the gutters. I merely hand him supplies and pick up whatever tools he drops. I am inside now and still shivering. Hot shower, hot soup, chocolate...still cold! Maybe I should sit on the heating pad and hold the cat on my lap for a while. Hmmm...I can see why she insists on having her little blanket plugged in and turned on. Ahhh...warmth! Oh how I long for the sunshine and summertime. Maybe I should go make something bright yellow in honor of the sun.
Happy creating...
Subscribe to:
Posts (Atom)